How to Do Your First Pull-Up: Step-by-Step Progressive Training Plan
Read our comprehensive guide on how to do your first pull-up: step-by-step progressive training plan.

Key Takeaways
- Start with lat pulldowns, inverted rows, and bicep curls 2-3 times per week to build the foundation strength you need.
- Master negative pull-ups by jumping to the top position and lowering yourself down as slowly as possible for 4-8 seconds.
- Use resistance bands around the bar to assist your pull-ups and practice the full range of motion.
- Progress to partial pull-ups where you pull halfway up and hold before lowering down to bridge the gap to full pull-ups.
- Most people can hit their first pull-up within 4-8 weeks if they train consistently.
Get a Free AI Coach on WhatsApp
Ask questions, get workout plans, and track your progress — all from WhatsApp.
Message Your CoachLearning how to do your first pull-up is a monumental milestone in strength training. However, it can seem daunting if you’re new to fitness or have never done one before. This step-by-step progressive training plan will help you achieve this goal with confidence and safety.
Understanding the Basics of a Pull-Up
Before diving into the training plan, it’s important to understand what a pull-up entails. Unlike other exercises, a pull-up requires you to lift your entire body weight using your upper body strength. This compound movement primarily targets the latissimus dorsi, biceps, and upper back muscles.
Step-by-Step Progressive Training Plan
1. Build Your Foundation
To successfully perform your first pull-up, you need to develop foundational strength in key muscle groups. Start with exercises like:
- •Lat Pulldowns: Mimics the motion of a pull-up, targeting the same muscles.
- •Inverted Rows: A bodyweight exercise that helps build upper back and bicep strength.
- •Bicep Curls: Focuses on strengthening your arms, which are crucial for pull-ups.
Perform these exercises 2-3 times per week, aiming for 3 sets of 10-12 repetitions each.
2. Master the Negative Pull-Up
The negative pull-up involves lowering yourself from the pull-up bar as slowly as possible. This eccentric movement helps to build the strength necessary for the concentric (pulling up) part of the exercise. Follow these steps:
- •Use a stool or jump to get your chin above the bar.
- •Slowly lower yourself down over 4-8 seconds.
- •Repeat 3-5 times per session, 2-3 times a week.
3. Utilize Resistance Bands
Resistance bands can assist in practicing the full range of motion involved in a pull-up. Loop a resistance band around the bar and place your feet in the band. The band will provide support as you pull yourself up.
According to a study published in the "Journal of Strength and Conditioning Research," resistance bands significantly reduce the load during pull-ups, making them an effective training tool.
4. Partial Pull-Ups
Progress to partial pull-ups to bridge the gap between assisted pull-ups and the real deal. This involves pulling yourself halfway up and holding the position for a few seconds before lowering yourself back down.
These should be done in sets of 3-5, with 5-8 repetitions each.
5. Full Unassisted Pull-Up
At this stage, you’re ready to attempt your first unassisted pull-up. Ensure you have a good grip, engage your core, and use an explosive motion to pull yourself up until your chin is above the bar.
If you’re struggling, don’t get discouraged. It might take multiple attempts and consistent practice before you’re able to perform one smoothly.
Common Questions and Concerns
Q: How long will it take to do my first pull-up?
A: It varies for everyone. With consistent training, most people can achieve their first pull-up within 4-8 weeks.
Q: What if I experience shoulder pain?
A: If you experience shoulder pain, it’s important to stop and consult a medical professional. Shoulder mobility and strength are crucial, and any pain could indicate an underlying issue.
Conclusion and Call to Action
Achieving your first pull-up is a rewarding experience that marks a significant improvement in strength and endurance. By following this step-by-step progressive training plan, you can systematically build the strength required for this challenging exercise. Ready to get started? Begin your journey today and celebrate each milestone along the way.
If you found this guide helpful, share it with your workout partners or on social media to help others achieve their fitness goals too!
'''
Frequently Asked Questions
- How long does it take to learn to do a pull-up?
- Most people can achieve their first pull-up within 4-12 weeks with consistent practice. If you're heavier or haven't done upper body work before, it might take longer. Losing body fat while building back strength speeds up the process significantly.
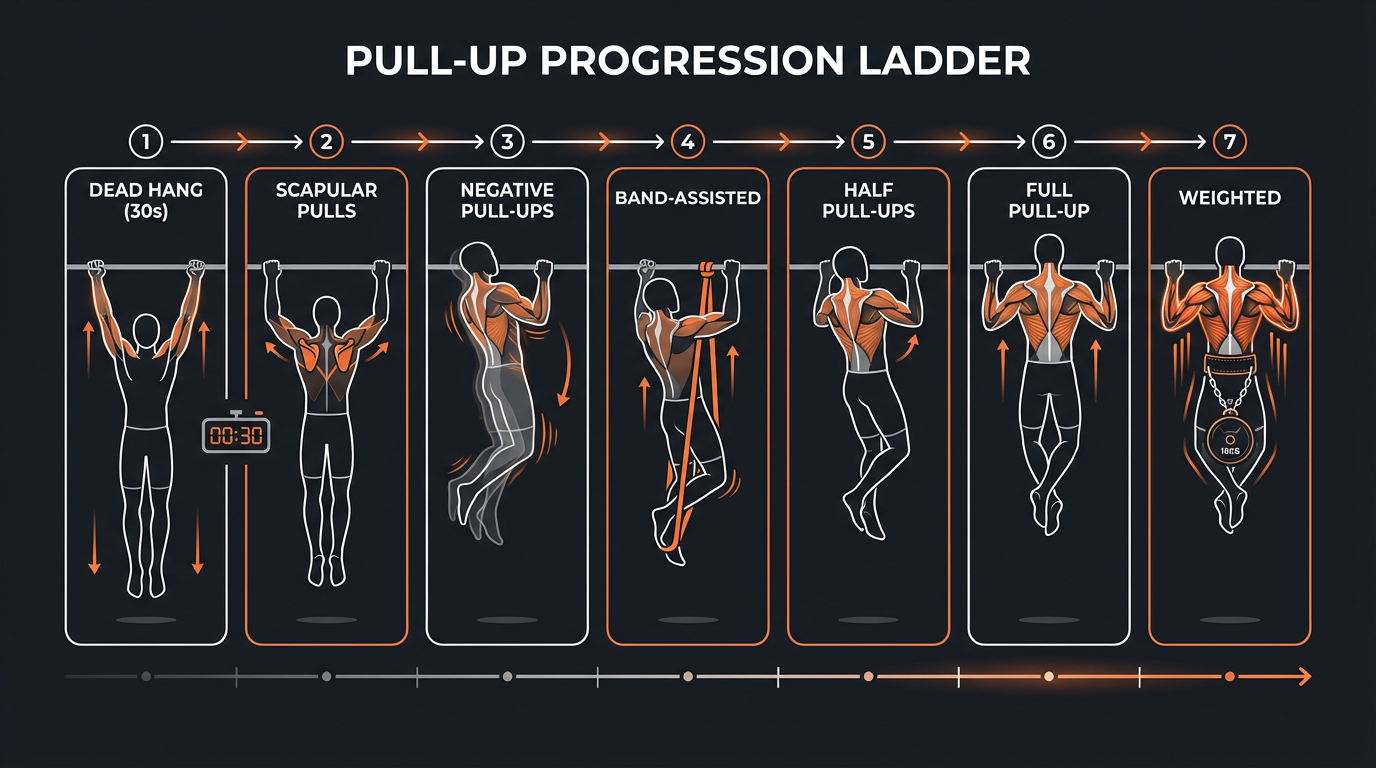
- What exercises help you get your first pull-up?
- Dead hangs, scapular pulls, negative pull-ups (jump up and lower slowly), band-assisted pull-ups, and lat pulldowns. Do these 3 times a week and you'll build the specific strength needed for a full pull-up faster than any other approach.
- Are resistance band pull-ups a good way to progress?
- They're decent but not perfect. Bands help most at the bottom (where you're already strongest in the hang) and least at the top (where you're weakest). Negative pull-ups are actually a better progression tool because they load the hardest part of the movement.
- Can I do pull-ups if I'm overweight?
- Yes, but it'll take longer because you're pulling more weight. Focus on building back strength with lat pulldowns and rows while simultaneously losing body fat. Every pound you lose makes pull-ups easier — it's like removing a weighted vest.