The Perfect Push-Up Form: Common Mistakes and How to Fix Them
Push-ups are a fundamental exercise for building upper body strength, but achieving the perfect push-up form can be challenging. In this article, we will explore common mistakes and how to fix them to ensure you get the most out of this powerful bodyweight exercise.

Key Takeaways
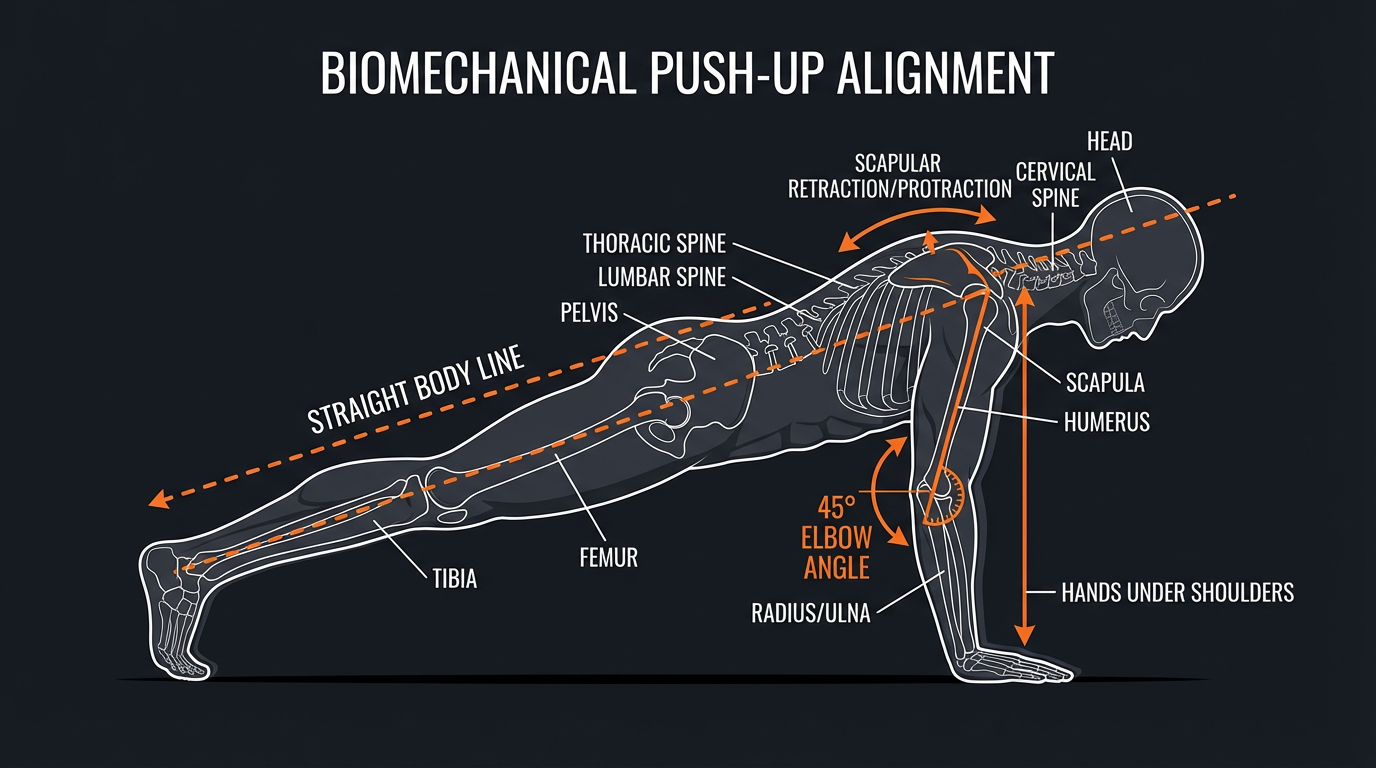
- Keep your elbows at a 45-degree angle instead of flaring them out wide to protect your shoulders.
- Engage your core like you're bracing for a punch to prevent your hips from sagging during the movement.
- Lower your chest all the way down until it's just above the ground for full range of motion and maximum muscle activation.
- Place your hands directly under your shoulders at shoulder-width apart for proper muscle engagement and balance.
- Keep your head in line with your spine by looking slightly ahead instead of letting it drop toward the floor.
Get a Free AI Coach on WhatsApp
Ask questions, get workout plans, and track your progress — all from WhatsApp.
Message Your CoachMastering the perfect push-up form will not only enhance your workout efficiency but also prevent injuries. Let's delve into the details!
Understanding the Basics of Push-Up Form
First, let's review the basic elements of a push-up. Maintaining the perfect push-up form involves:
- •Keeping your body in a straight line from head to heels.
- •Engaging your core muscles throughout the movement.
- •Ensuring your hands are placed shoulder-width apart.
- •Lowering your body until your chest is just above the ground.
- •Pressing back up to the starting position.
Despite its simplicity, many people struggle with push-ups due to common mistakes. Let's identify them and provide solutions to help you achieve the perfect push-up form.
Common Push-Up Mistakes
Even seasoned athletes can make errors in push-up form. Here are some of the most frequent mistakes:
- •Flared Elbows: This happens when the elbows point outwards, placing undue stress on the shoulders.
- •Sagging Hips: Allowing your lower back to sink disrupts the alignment and increases injury risk.
- •Limited Range of Motion: Not lowering your body sufficiently diminishes the exercise's effectiveness.
- •Head Dropping: Letting your head drop can cause neck strain and disrupt spinal alignment.
- •Hand Position: Placing hands too wide or too narrow alters muscle engagement and may lead to imbalances.
Fixing the Flared Elbows
To fix flared elbows and maintain the perfect push-up form:
- •Ensure your elbows are at a 45-degree angle from your body as you lower down.
- •Focus on squeezing your shoulder blades together.
- •Practicing wall or inclined push-ups can help you focus on elbow position without straining your shoulders.
Preventing Sagging Hips
Core engagement is crucial for preventing sagging hips. Here are steps to help:
- •Tighten your abs as if bracing for a punch.
- •Maintain a slight posterior pelvic tilt by tucking your tailbone.
- •Consider performing push-ups on your knees to master the form before progressing to a full push-up.
A study by the National Strength and Conditioning Association found that core strength is significantly improved by correcting form during push-ups. Hence, always engage your core!
Improving Range of Motion
A full range of motion ensures maximum muscle engagement. Follow these tips:
- •Lower your chest until it is just above the ground.
- •If needed, use a cushion or stack of books as a depth guide.
- •Incline push-ups can also help you practice lowering your body fully without reducing the load.
Maintaining Proper Head Alignment and Hand Position
Finally, it's vital to maintain proper head alignment and hand position:
- •Keep your gaze slightly ahead of you to maintain a neutral neck position.
- •Ensure your hands are directly beneath your shoulders.
- •Avoid placing hands too far apart or close together; shoulder-width is ideal.
Properly positioning your hands engages the right muscle groups and promotes a balanced workout. This practice is endorsed by fitness experts and helps to avoid repetitive stress injuries.
Conclusion
Mastering the perfect push-up form is essential for maximizing the benefits of this classic exercise while preventing injuries. By addressing common mistakes such as flared elbows, sagging hips, limited range of motion, head dropping, and improper hand position, you can significantly improve your push-up performance. Remember, proper form not only enhances effectiveness but also contributes to long-term fitness progress.
Ready to perfect your push-ups? Start implementing these tips today! If you found these insights helpful, share this article with your workout buddies or leave a comment below with your push-up experiences!
Frequently Asked Questions
- What is the correct push-up form?
- Hands slightly wider than shoulder width, fingers pointing forward, body in a straight line from head to heels. Lower until your chest touches the floor (or gets within an inch), elbows at about 45 degrees, not flared out to 90.
- Why do my elbows hurt during push-ups?
- You're probably flaring your elbows out to 90 degrees, which puts a ton of stress on the elbow joint. Tuck them to about 45 degrees from your body, like an arrow shape rather than a T shape.
- How far down should I go on a push-up?
- All the way down until your chest touches or nearly touches the floor. Half-reps are one of the most common push-up mistakes. If you can't go full range, elevate your hands on a bench and work the full range there.
- Why does my lower back sag during push-ups?
- Weak core. Your abs and glutes should be braced hard during every rep. Squeeze your glutes, tighten your core like someone's about to punch you, and think about pulling your belt buckle toward your chin. If you still sag, start with planks.
- How many push-ups should a beginner be able to do?
- If you can do 5-10 with proper form, you're in a good starting spot. Can't do any? Start with incline push-ups on a counter or bench and work your way down to the floor over a few weeks. Quality always beats quantity.